
A very long time ago, nearly two years ago to be exact, I made myself some slippers following this very excellent pattern.
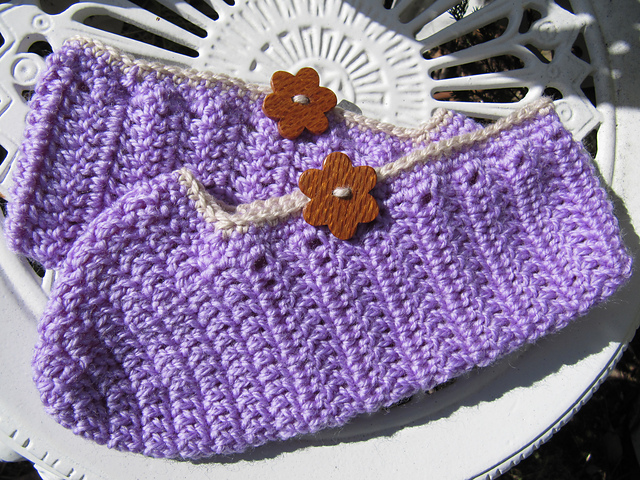
Since then, however, I've tweaked and changed the pattern and made it my own. I've made well over half a dozen pairs of slippers using it, and I've finally gotten around to posting it on here so everyone can use it (also so I can link up my projects on Ravelry!).

Because I like to use 8 ply (DK weight) yarn, and it's what I have a lot of, this pattern is made with that in mind. The original pattern (see link at the top of the post) is written for 10 ply, if that's more your thing.
These slippers are quick and easy to make, I can make a pair in just a few hours!

- DK weight (8 ply) yarn in two colours (approximately 120m for main colour and 6m for edging colour)
- 5mm crochet hook
Tapestry needle for finishing and sewing in the ends - Two Buttons
Notes:
- Pattern uses US terminology.
- Stitches used: chain (ch), slip stitch (slst), single crochet (sc), double crochet (dc), stitch (st).
- Magic Ring (also called Magic Loop) -- magic loop video (here are some written instructions)
- dc4tog: yarn over the hook, insert hook into stitch, yarn over, pull up loop (3 loops on hook), yarn over, pull yarn through the first two loops on the hook (2 loops on hook). Leave these two loops on the hook, and repeat the process another three times - you will have a total of FIVE loops on your hook. Yarn over the hook, and draw it through ALL FIVE loops, so that you only have one loop on your hook. (If you need more help with this, go here: How to decrease double crochet)
- sc2tog: insert hook into stitch, yarn over the hook, pull up loop (2 loops on hook), insert hook into next stitch, yarn over hook, pull up a loop (3 loops on hook), yarn over the hook and draw yarn through all three loops (one loop on hook)
- sc3tog: as for sc2tog, but worked into three stitches instead of two, so you'll end up with a total of 4 loops on your hook before you put the yarn over the hook and draw it through all four loops.
INSTRUCTIONS
This first part is worked in rounds. Don't turn your work!
TOES:
Using your main colour, make a magic ring (see "Notes"), ch 2.
Round 1: 12 dc in magic ring, join with a slst. Pull the magic ring closed. (12dc)
Round 2: ch2, *dc in first st, 2dc in next st, repeat from* (2dc in every second stitch), join with a slst (18dc)
Round 3: ch2, *dc in each first st and next st, 2dc in next st, repeat from* (2dc in every third stitch), join with a slst (24dc)
Round 4: ch2, *dc in each first st and next two stitches, 2dc in next st, repeat from* (2dc in every fourth stitch), join with a slst (30dc)
Round 4: ch2, *dc in each first st and next two stitches, 2dc in next st, repeat from* (2dc in every fourth stitch), join with a slst (30dc)
Round 5: ch2, *dc in each first st and next three stitches, 2dc in next st, repeat from* (2dc in every fifth stitch), join with a slst (36dc)
Rounds 6 and 7: ch2, dc in first stitch and every other stitch, join with a slst (36dc)
Now, you stop working in rounds and begin to work back and forth in rows.
FOOT:
Row 1: ch 2, dc in first st and the next 23 st, turn (24dc)
Rows 2-13: ch2, dc in each st across, turn (24dc) (Adjust as necessary to fit your foot, my feet are size 7 and a half. For size 6 feet I do two less rows.)
Row 14: ch2, dc in each of next 10 st, dc4tog (see "Notes"), dc in next 10 st (21dc)
Okay, now this bit may be a little tricky, if you don't understand it at first, read it again, and if you still don't quite get it, don't be afraid to give it a go - crochet is easily undone! Essentially, we are making a seam to close up the back of the slipper.
Chain 1, and make a sc in the first stitch and the next nine (9) stitches (total of 10 sc), and make a slst in the next stitch. Now, fold the right sides together and slip stitching though the top of the dc and sc, repeat 9 more times (if you did a different number of dc rows, the sc may be at the front). The seam will be on the INSIDE of the slipper once you turn it right side out again.
We're up to the edging (part one)! And we're working in rounds again.
EDGING (Part One):
Round 1: ch1, 2sc in the side of each dc (see picture below), and in the top of each dc from the toes section, including the ones which were worked into when the foot section was started. (It should be about 70sc, but don't panic if it's not. So long as it's even it's fine.) At the end of the round, join with a slip stitch.
(This bit is confusing to explain too - hold tight! Basically, you make 4 seperate sc3tog at different (symmetrical) points around the round to tighten the slipper a little, keep that in mind and you should be fine.)
Round 2: ch 1, sc in first stitch and next stitch, sc3tog (see "Notes"), then sc in each st until the second last sc before the one done in the dc what was worked into when the foot section was started on the previous round (did that make sense? See round 1 to clarify.) and make another sc3tog to tighten the corner. Work across the toes, making a sc in each st, finishing one stitch short again, and making another sc3tog. Work up the side of the slipper, making a sc in each st, stopping 5 sc short of the end of the row. Make another sc3tog, and then sc to end of round, joining with a slip stitch, cut the yarn and draw through the stitch.
The Edging (Part 2):
We're nearly there! Make sure you read ALL of the next step before starting. Also, for the second slipper, remember that the chain loop needs to be made on the FIRST side you sc down, not the second (as instructed below), otherwise one of your slippers will have the button on the wrong side!
Join the yarn you are using for the edging by inserting your hook in a stitch, drawing up a loop and making a chain.
Single crochet in each stitch, making a sc2tog (see "Notes") in each of the front two corners. Approximately a third of the way up the second side (about 8 or 9 sc), make a chain loop by chaining 24, then make another sc in the SAME stitch. Sc to the end of the round, join with a slip stitch. (Remember, for the second slipper, make the chain loop while working down the first side.)
Finishing:
Cut a tail of about 30cm, and draw it up through the last slst. Thread the tail onto the tapestry needle, insert under the very first slst (from Round 1), and back into the centre of the last slst. This makes an invisible join and is very neat. Weave the tail under the stitches of the same colour down the OPPOSITE side of the chain loop until it is even with the loop (hold the sides of the slippers together to determine this), and use the yarn to sew on the button.
Weave in all the end, put them on your feet and take a photo!
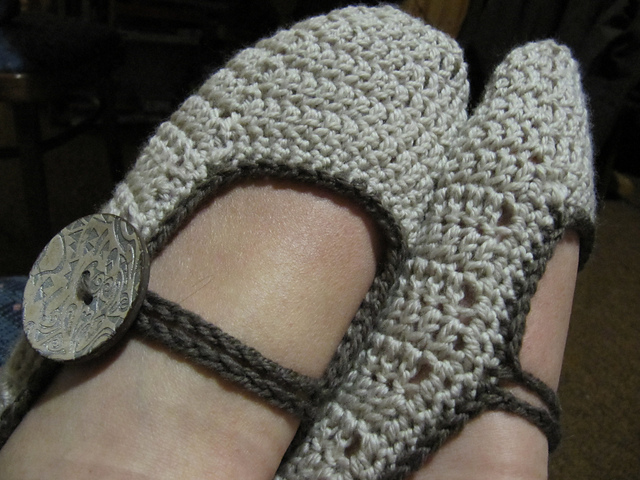
I hope you enjoy making some slippers for yourself - if anything is unclear, don't hesitate to contact me, either by email or through Ravelry. Likewise, if you see any mistakes or can think of a better way to explain something, send me a line!
Happy slipper making!
The copyright of this pattern remains with myself. It is provided free for personal use only. The pattern may not be reproduced for commercial purposes. If you want to sell products you have made from this pattern, you are free to do so (please refer to my FAQ page).

Summer Slippers by Katherine Crombie is licensed under a Creative Commons Attribution-ShareAlike 3.0 Unported License.
The copyright of this pattern remains with myself. It is provided free for personal use only. The pattern may not be reproduced for commercial purposes. If you want to sell products you have made from this pattern, you are free to do so (please refer to my FAQ page).
Summer Slippers by Katherine Crombie is licensed under a Creative Commons Attribution-ShareAlike 3.0 Unported License.


