Showing posts with label thrifty. Show all posts

Wednesday, October 23, 2013

In the Garden: There is Life!

After a week of anxious waiting, yesterday I was thrilled to return home from work to teeny tiny beetroot sprouts!


Today, there were finally signs of life outside in the "real" garden too.

Snowpea!


More beetroot!


Lettuce!


Since taking these photos another snowpea and a bean have poked out too. YAY!

Meanwhile, I have six tomato plants and a chili plant on my kitchen windowsill. 


Behind them, the view to the garden - my little tiny veggie garden!


And the strawberries? Between the three plants are growing more than thirty strawberries! Woohoo!


Monday, October 21, 2013

Almond Crumble

Dedicated readers and faithful family members may remember that a long time ago, I made almond milk.

Recently, I have started making it again, as Julian has decided to cut dairy out of his diet (he is fairly sure he is mildly lactose intolerant). 

I have simplified the recipe for almond milk even further:

  1. SOAK: 1 cup of natural almonds overnight in plenty of water
  2. BLEND: Drain, rinse, and blend in fresh water (a few cups)
  3. STRAIN: Though a muslin cloth (a clean hankie works perfectly), add water to make volume anywhere between 1 to 2 litres
Easy peasy!

The only problem is that making almond milk at least once a week leaves me with lots of almond meal. As in, mountain of meal.

I know there are lots of recipes for using almond meal all over the internet, but my almond meal is quite coarse (a stick blender only gets so far). While I think it would still work for the various recipes, I have another issue: lots of these recipes call for ingredients that my budget frowns upon. Glares, even.

So, here is a quick, easy and versatile recipe:

ALMOND CRUMBLE!


Now, first things first: after making the almond milk, I usually toast the almond meal a little to dry it out. I try to get it fairly close to its original dry weight (1 cup of almonds is 150grams - after soaking though, it can be close to 300grams). I recommend NOT skipping this step. Also, it smells nice.

Now that you have your lightly toasted almond meal, we are ready to begin making our almond crumble!

Gather together these ingredients, bearing in mind that this is more a guideline rather than a strict recipe where things MUST be certain amounts:
  • almond meal (approx 150g/1 cup)
  • desiccated coconut (approx 70g/0.5 cup)
  • brown sugar (approx 40-70g depending on sweetness desired - 0.3 t0 0.5 cup)
  • butter (approx 70grams - I like a decent amount, as I "taste test")
  • Other indredients such as finely chopped walnuts, or spices such a cinnamon
Stick all the ingredients in a bowl and use your fingers to rub in the butter. Have numerous samples! Yum! When the butter is all rubbed in, the consistency should resemble course breadcrumbs.


Now that you have made the basic crumble, there are various uses for it. So far I have used it as a topping for apple crumble and for apricot crumble...


... just bear in mind that in tends to burn rather easily, so keep an eye on it, and perhaps cover it with foil for part of the baking time.


I have also used it as the filling for butterscotch spirals - seriously good! Make a batch of scone dough*, roll it into a rectangle, spread with creamed brown sugar and butter, top with crumble mixture, roll up, slice, place in ring tin and back in hot oven.


*I use a basic scone dough recipe from the Central Cookery Book (a Tasmanian classic). This recipe looks similar, though add in a teaspoon of sugar for sweet scones (or just put in a pinch of salt). A lot of scone recipes use far too much sugar. 

Any other ideas how this crumble could be used or adapted? Leave a comment below so I can try it!

And follow me on pinterest - I repin lots of creative things :D

Wednesday, October 16, 2013

In the Garden: Seeds Are In!

My mother-in-law came over yesterday to help us dig our garden. We added lots of poo into the soil! Sheep poo and cow poo - yummy yum yum yum! We found three worms; hopefully more will turn up now the soil has all been turned and manured.

My two helpers did an excellent job digging up and weeding, but not such a good job when it came to smiling for the camera:


And here is is all dug! Down one side are bamboo support poles. Soon they will be covered with climbing beans and snow peas. 


Since taking this photo, the top pole, which goes across the top of the three teepees, has also been tied on.

As you can see from the above photos, there is a huge pine tree at the back of the yard. When we were digging up the dirt we found lots of pine roots. At first they were just discarded, but we found a fantastic use for them: ties for the bamboo teepees. I love the rustic look of the pine roots being used to tie the bamboo poles together.


The majority of the garden has been planted now. Only the snow peas need to be sowed, and the celery transplanted. 

Here is the garden, all sown and planted (minus snow peas and celery):


Oh, humble beginnings! Soon this will be a thriving patch of deliciousness!

Already planted, we have:

  • climbing beans 
  • silverbeet (the colourful variety)
  • dwarf beans
  • two heirloom varieties of beetroot
  • loose leaf lettuce
  • spring onions (all SIX HUNDRED AND FIFTY seeds accidentally dumped in one area!)
  • zucchini (this may not germinate, the soil may be too cold)
  • lettuce seedlings
  • Asian greens seedlings (the names of which I can't remember, except that one of the four types is red mustard)
  • parsley and sage (shown below)


As it is such a small patch, I cheated a little when planting the rows of beans and beetroot. I figured that as beans can be planted 10cm apart, I would do the rows much closer than the recommended 50cm. As I will not have to walk between the rows, the closer group planting ought to be more than fine.

Most importantly, the strawberries are thriving. I am looking forward to the first ripe strawberry so much!


Inside, the tomatoes have blossoms forming and the capsicums and chili plant are doing well. Just today I repotted some basil seedlings, which will also be kept inside. No doubt the next post will have pictures of all the indoor plants.

Grow plants, grow!

Wednesday, October 9, 2013

The Garden Begins

The table in my loungeroom has been hijacked by a tarp and plants.


Strawberries! I am looking forward to these fruiting so much! There are three varieties in this pot: Tioga (at the front), Strawberry Delight (pink flowers - squee!), and hokowase with the long stems.


Growing up, my family always had a vegetable garden and fruit trees. Without them, we would definitely not have been eating as well as we did, as my Dad (a Vietnam Veteran) struggled with anything more that casual work (as many VV's do).

Since getting married, my husband and I have lived in units, and could never grow anything apart from some herbs in pots. Finally, though, we are in a house! With a yard! A biiiiig yard! We moved in way back in May, and at last I am getting myself into garden-making-gear.


On Sunday my mother-in-law and I hit the shops and bought garden gear. About time too, as we are half way through spring. As you can see above, we have seedlings, seeds, manure, hot pink gardening gloves (a necessity). We aimed for veggies that mature within 8-12 weeks, as my husband and I are most likely moving house at the end of summer. 

I have also been making some origami newspaper planters (here is a smaller version). 


I can't wait for fresh tomatoes, spring onions, lettuce, crispy beans and capsicum! This is going to be a delicious summer. 

I still need to dig the garden, however...


'Like' my page on facebook! And follow me on pinterest! I am much better at staying active on them ;-)

Friday, March 26, 2010

I Am Totally Impressed by Utas

There is something at the University of Tasmania that is new, green and tasty. It is not hidden away behind the horticulture building and it does not involve a concrete slab building. 

What is it?

Why, it is the new organic food co-operative and community garden! 


Source is on university property, right near the hub of uni life (that is, the uni bookshop, bar, newagency and the ref - a cafeteria of sorts). It is a straw bale and timber building (love), has a pizza oven and a rather large community garden. So many pumpkins, tomatos and beans! The cauliflowers are growing well too. 

 A pretty vegetable picture! 
These are actually from Woolworths (a huge supermarket chain).... though the zucchini is from someone's veggie garden, so it might be organic!

Inside the store you can buy organic veggies and fruit (some from that very garden) as well as organic honey and other things you would find in a health food store (agave nectar! I really want to get some). 

This centre also has a green recycling system, meaning that the wastes from the ref can are now getting turned into compost. (Though if they used all the waste food that would be a MASSIVE amount of compost... I wonder how much they are actually using?)

If you become a member you get a discount of 20% on everything there, but I'm not sure abouut joining as it seems to have more responsibility associated with it than most other memberships do (such as doing volunteer work sometimes). It is a co-op, after all. Also, the prices are very competitive. I did not see any that made me think, "they're crazy, asking that much!"

It is going to be so much easier for me now if I want to buy something organic, seeing as I am already at the uni a couple days a week. I leave you with the objective of Source:

The provision of low cost, local, organic and minimally packaged food to members in a manner which provides them with a hands-on education in how to live more sustainable in an urban environment.

Sounds good to me!

Kathy xx

Thursday, March 11, 2010

Homemade Laundry Detergent


I have been making my own Laundry Detergent for some time now, over a year in fact. If you haven't done this, I really encourage you to give it a go! It is easy and cheap, and works really well. In addition, it only takes about 20 minutes to whiz up.
I am very happy with the results. When I first tried it, my reaction on pulling the clothes out of the machine was "whoa - soft!" My machine is a front-loader, but this powder mix dissolves without any problems. I use white vinegar mixed with a few drops of tree tree oil as a softener - about a tablespoon. The results are heavenly!

I found the recipe on
Rhonda's blog, here is a direct link to the post - well worth a visit if you are interested in making your own cleaning products.

I was able to find all of the ingredients at Woolworths. I bought a container to store it in too.
Laundry Detergent (powder)

4 cups grated laundry or homemade soap or soap flakes (Lux)*
2 cups borax
2 cups washing soda

Mix all the ingredients thoroughly and store in a plastic container with a lid. Use 2 tablespoons per wash. This powder will not make suds and this is perfectly okay.

This batch lasted me 7 months, at about 1-3 loads a week.

*I used Homebrand laundry soap, which I grated and the whizzed with my stick blender to make it tiny so it would dissolve really easily.
Also, I wrote the ingredients on a label and stuck it to the container - just incase the cat decides to eat it and we have to rush him to the vet... you know... the usual.

Monday, March 1, 2010

Blackberry Jam: A Story of Being Cooked.

The Day We were Put in a Jam (as opposed to a pickle)
Once upon a time, on an island known as Tasmania (famed the world over for apples, cheese and beer) we were growing happily on a thorny bush. One day, when we were big and black and round, a person - you know her as Kathy - came along with an old icecream container and started to pick us, one by one. Plop! Into the container we would go. Some of us were spared the container only to suffer the horror of being put into Kathys mouth and eaten. The indignity of it was almost unbearable. We are only grateful that her niece was absent, otherwise it is doubtful that any of us would have made it into the bucket at all.
Crammed together in the container, we were carried back to Kathys lair. We were tipped into a strange container with holes in it and water was poured all over us. Those of us who had been in the sun only moments earlier were shocked by the coldness that was now bringing our core temperature down to dangerous levels. This was nothing to the torture that was about to be thrust upon us.
We were scooped out of the strange, holey container and thrown into a solid metal one. A white, sand-like substance was tipped on top of us. Then it started to get hot. At first it was pleasant, but as the temperature rose, our comfort level dropped, and we started to sweat. The sand-like substance started to turn into a clear liquid, stained red with our juices. The temperature continued to rise. Some of us were beginning to loose our grasp on reality. A few of us broke down. Literally. 
The temperature was so hot now that we were bouncing and bubbling without control - a foaming, purple mass. Just when we thought we could stand it no longer, the heat subsided. Then, we were falling. We found ourselves in clear containers. We quickly realised that we were trapped, for discs of metal were used to cover over our only possible exit. What is our fate going to be? Is there any hope of rescue?
(A story of jam making, as told by a talkative and rather dramatic blackberry.) 


Three Minute Berry Jam
This recipe is suitable for all sorts of berries, including raspberries and boysenberries.


2 and a 1/2 cups of berries
2 and a 1/4 cups of sugar

Put the berries and the sugar in a saucepan. Bring to the boil, stirring until the sugar is dissolved. Boil briskly three minutes. Pack and seal.
If the fruit is very ripe, a further minute of boiling is desirable.
The jam will appear lightly set at first, but it thickens after a few days of storage.
Due to the quick cooking time, the fruit does not breakdown a great deal. If you want less lumps, use a potato masher to squish and squash the fruit. Do this before bringing it to the boil.
Makes about 2 x 350 millilitre jars (that is, two medium sized jars).


For sterilizing jam jars, go here.
By the way, the blackberries are still imprisoned in the jars... I will rescue them one day. Too bad their visit to toast/scone/waffle heaven won't last long!

Wednesday, February 17, 2010

Thrifty is a Nice Word (Unlike 'Frugal')

Being frugal is very popular at the moment - there are so many blogs and articles and information sites that talk about how to be frugal, how to save money, how to bulk buy and make your own.

Don't get me wrong, this is a good thing! A very good thing! But how many of you are like me? You read all this information until your eyes get twitchy and you get grumpy, and you bookmark a hundred and one pages and you do... maybe one thing. Two if you're super motivated. Oops!

Artichoke Flower

True, I do write a shopping list. I always have because that is what mum did. I menu plan now, but I'm still getting that down pat. (Next fortnight I'm going to be trying a different method which I'll let you know about.) I use homemade cleaners. In someways it is more expensive as now I clean more. Haha! But seriously, my homemade washing powder works a treat. I crochet, so that covers a lot of birthday and Christmas presents. The only problem is that I now love yarn and if I had no self control I would by so much more than what I do now.

I have been thinking about my reluctance to jump onto the frugal bandwagon and I think I have identified problem.

'Frugal' is a horrible word. I have no nice images associated with it. It looks un-pretty and doesn't roll off the tongue nicely. Y. U. K. It has a good definition: to practice economy; to live without waste. Despite this, I don't want 'frugal' to be the adjective chosen by people to describe me.

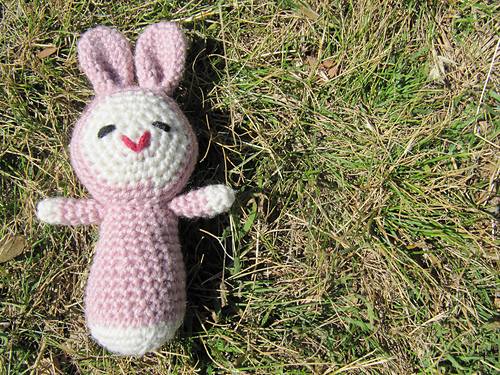
Bitsy Bunny, made for a friends baby. Pattern is here and here (Ravelry).

'Thrifty', however, I like. It has more of an old-world charm about it. It has sweet images of aprons and embroidered tea towels associated with it. And cups of tea, steaming with deliciousness. (I'm not a big tea drinker but I'm seriously tempted right now). Its meaning is much, much nicer too: wisely economical (phew, I can still go to the movies occasionally); industrious and thriving (I like the sound of that); prosperous (yes please!); growing vigorously, thriving, as a plant. (Which reminds me, I have to water my herbs.)

Isn't that so much nicer? Thrifty has so much more room for romance than sensible frugal does. Marilla Cuthbert was frugal (I love her very much, but gee, she was sensible and prudent!). Mrs March (you might know her better as Marmee), on the other hand, I would describe her as thrifty. I want a happy home like she had - minus an absent husband and Aunt March, of course!