Showing posts with label scarf. Show all posts

Monday, April 4, 2011

Making the Saroyan

(Crocheters, there's a little note at the end especially for you!)

I've had a few people comment on the saroyan I made for my sister, asking if it would be too hard for an inexperienced knitter, or saying that they "could never make that".

In response, I want to encourage all of you who knit, love the scarf, but are hesitant to have a go at it. It was my first lace project. If you can knit and purl, you have the prerequisites to make this scarf. The leaves that edge the scarf are made using combinations of decreases (such as knitting 2 stitches together: k2tog) and increases (like yarn overs [yo] and knitting into the front and the back of the stitch [kfb] which may be difficult if you knit very tightly, but other than that is simple).

If you look at the picture below, you can see that the majority of each row is plain stockingette: knitting and purling. Very easy! The leaf portion of each row is very small.


Looking at an individual leaf (see the picture below), you can see that a portion of each leaf contains a significant amount of stockingette stitch, just like the body of the scarf. The holes are made using yarn overs (yo) which really are very easy: simply wrap the yarn anticlockwise from bottom to top around the needle in your right hand (for right handed knitters, of course, the other needle if you're left handed). The leaf also uses one or two other increases, which are all demonstrated here at Knitting Help.
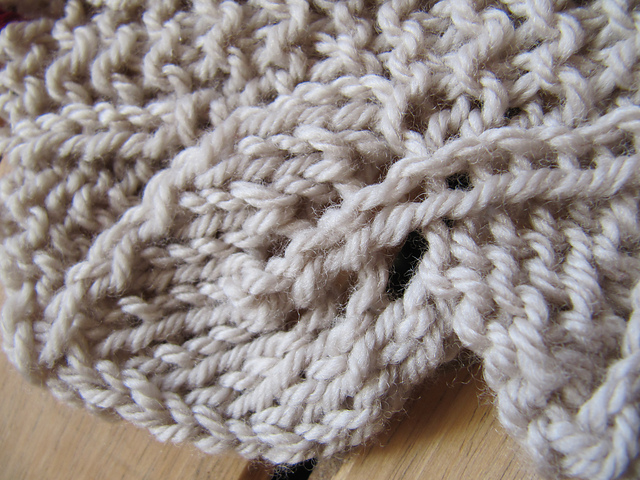
The leaf also utilises decreases to form its shape, these can all be seen here, also at Knitting Help. Knitting Help really does live up to it's name: you will also find videos on how to cast off, which you need to know, as when a leaf is completed, six stitches are cast off, making the leaves stand out more. This is simple, and not something of which to be nervous.

As with many projects, the first bit is the hardest, but by no means is it impossible. If you visit my project page on ravelry for the saroyan, you can see the changes I made. You can also see that it only took me a month to make (as I restarted it on the 23rd of November after deciding that I wanted to begin it differently to how the pattern is written). You will also be able to finish this in a month, just by doing one repeat (that is, a new leaf) every day. If you visit the ravely pattern page for the saroyan, you will get more information, and you will also be able to look at the saroyans made by other people, finding information and tips.

Lastly, let me encourage you by saying this: if you don't try to learn new techniques (such as knitting lace) your knitting skills will stagnate and you will will never know what you are capable of doing and making.

For the crocheters out there who like this design but never want to knit, Camille is a crochet version of the Saroyan, and really is very pretty - I plan to make it one day. I imagine that it would be gorgeous made out of a merino and silk blend: warm yet drapy.


Saturday, September 11, 2010

Hello Out There!

Well I nearly managed to make it a month since my last post, but was getting itchy to pop in a say hello! I was going to do a post on my favourite underwear, but wasn't sure how that would go down with the husband...

Since the 13th of August several things have happened:
 - Tasmania had its first real taste of winter. (Read: snow!!!! About 3mm of it. Though there was a lot on Mt Wellington.)
 - Spring is very much here - blossoms everywhere and sunshine and daffodils. I love spring.
 - My potted Rosemary has sweet purple flowers


 - I had a 3 week teaching practicum, which was great and I passed! Woohoo!!! This is why I'm so happy about passing.
 - I did the dishes. Twice.
 - I finished knitting this scarf: 


 - And all these slippers: 


- I started this scarf (only 40% to go!)


 -  I received the wool to make another scarf exactly the same as the above scarves... but business is business and I've already been paid, so scarf making has got to happen.
 - Found out I that I weigh more than I thought I did. If only it were trim muscle and not blubbery blubber cushioning.
 - I read Little Lord Fauntleroy. I loved it. I never wanted it to end. And the grandfather's dog? His name is Dougal. Just like my 8kg cat!
 - I found out how uncooperative my cat can be when it comes to taking photos. (Just look at the camera sensibly!!!)


Yeah, so that is my super exciting life. I know, don't you wish you were me?

Tuesday, April 6, 2010

Urban Neckwarmer: Design Process

The crocheters (so wanted to write crocheteers, like musketeers) among my readers will be happy to know that I have been plugging away at a neckwarmer version of the Urban Shells Scarf. At the moment I am working on one which is the same as the original scarf pattern, only using 10ply wool and a 5.5mm (I) hook and worked to a shorter length (here is the ravelry link). However, the first one I made I adjusted enough to justify writing a seperate pattern for it. I have not written the pattern up yet (would the crocheteers out there like a chart?) but I thought I would share a bit of the design process.

Do you do this when you are bored or stuck at a dead end?

The starting chain for the scarf needs to be a multiple of 6 and 4 (so 12, 24, 36 and so on), but with this neckwarmer I wanted it to be slightly narrower. It was important to make sure the starting chain was a multiple of 4 so that the edging would work. This meant I was left with an extra stitch for the main body of the neckwarmer (Oh no! I just realised that I have a mistake on the chart I have drawn! Well, that explains why there was only one left over stitch when there should have been 2 left over.) Anyway, mistake realised and now feeling rather sheepish, I now know why I had to slip stitch into the turning chain! Haha too funny! 

I love the button placement in this picture.

Moving on and pretending no mistakes were made, I adjusted the amount of ribs (the 3D-esque stripe-like feature) there would be in the neckwarmer to account for that extra stitch. I was not sure at first how to change the pattern, but ended up with a double rib down the centre of the neckwarmer, which I like a lot.

 I have not figured out a good clusure yet - the button is temporary. 
Suggestions would be welcome!

This neckwarmer was so fast to make up and the Bendigo Woollen Mills Luxury Yarn is just so lovely to have against the skin (and it is machine washable and so very wonderfulty affordable!). So, pattern (mistake free!) or not? I await the jury's verdict :)

Friday, February 5, 2010

Urban Shells Scarf - Free Crochet Pattern!


There is something immensely satisfying about having an idea, and then making it come into being. As I tell DH, I burst with pride inside every time I look at something I made that was TOTALLY my idea. It's such a rush!

The Urban Shells Scarf has been my latest rush... I love this scarf so much!


I named the scarf “Urban Shells” due to the combination of the shell stitches and the post stitches, which created ridges that remind me of power lines. The name of the scarf makes me think of Sandy Bay beach which is so very close to Hobart - a beach (complete with real shells!) in an urban area.


One of the wonderful things about this scarf is that the edging gets done as you go, so when you are done you actually are done! (And there are less ends to weave in - YAY!)


Here is the pattern - I hope you love it as much as I do! (For those of you on Ravelry, here is the link.)

ETA: the pattern is now available as a pdf download on my "Beautiful Crochet" page - see the link below the blog header.


Urban Shells Scarf
300m of DK weight yarn
4.5mm crochet hook
Tapestry needle for sewing in the ends

Measurements: 4.25inches (11cm) wide and 52.5inches (133cm) long

Stitches used (US terminology): chain (ch), slip stitch (slst), single crochet (sc), double crochet (dc), triple crochet (tr), back post double crochet (bpdc)* and front post double crochet (fpdc)*.

Here is a video tutorial for front post double crochet (fpdc) and back post double crochet (bpdc). (This one is good too.)

Special stitches: shell (sh): (2dc, ch1, 2dc) in same stitch or space.

Note: a bpdc gets worked when the wrong side (WS) of the scarf is facing you fpdc gets worked when the right side (RS) of the scarf is facing you. 'St' stands for Stitch,m 'sk' means Skip and 'chsp' means Chain Space (i.e. space created by chaining, such as in the center of the shell). I used 300 yards of a DK weight yarn, but the pattern will easily lend itself to other yarn weights.

INSTRUCTIONS:
Chain 26 (multiple of 5 plus 1 chain for turning)
Row 1: sc in second ch from hook. Sc in each ch across, turn (25sc)
Row 2: ch4, tr in same st, sk 3 st, (slst, ch4, tr in same st), rep across row, ending with a slst in the last st. Do not turn, instead rotate 180' (6 scallops)
Row 3: ch2, sh (shell) in first st, *sk 2 st, dc in next st, sk 2 st, sh in next st, rep from *. Turn
Row 4: ch2, sh in chsp of previous shell, *sk 2 st, bpdc around dc from previous row, sk 2 st, sh in next st, rep from *. Turn
Row 5: ch2, sh in chsp of previous shell, *sk 2 st, fpdc around bpdc from previous row, sk 2 st, sh in next st, rep from *. Turn
REPEAT ROWS 4 and 5 UNTIL SCARF IS DESIRED LENGTH (or the yarn has nearly run out!)
SCALLOP EDGING (so that both ends match!):
Row 1 (WS should be facing you): ch2, 2sc in chsp, *ch1, bpdc around fpdc from the previous row, ch 1, 3sc in chsp of sh from previous row, rep from * until second last sh, ch1, 2sc in sh, turn (25sc)
Row 2: ch1, sc in top of each st to the end of the row, turn (25sc)
Row 3: (ch4, tr) in same st, sk 3 st, (slst, ch4, tr in same st), rep across row, ending with a slst in the last st (6 scallops)
Fasten off yarn and weave in ends.

Stand back and admire, then wrap it around your neck and go look in a mirror!


Please, if you have any questions, let me know!

The copyright of this pattern remains with myself. It is provided free for personal use only. The pattern may not be reproduced for commercial purposes. If you want to sell products you have made from this pattern, you are free to do so (please refer to my FAQ page).

Creative Commons License
Urban Shells Scarf by Katherine Crombie is licensed under a Creative Commons Attribution-ShareAlike 3.0 Unported License.