Showing posts with label free pattern. Show all posts

Saturday, November 9, 2013

Cord Edged Coasters: Free Crochet Pattern!

It seems to me that half the people I know are really tired right now, and I am right there, yawning along with them.

On Thursday, in my half asleep haze, I watched a couple of old movies (Babe, Pollyanna) while my fingers hooked up an incredible EIGHT coasters.


I then used Snapchat to turn them into pictures to send to my friends: 


I thought I would share the incredibly simple pattern with you.

I used a ball of 8ply (DK) that I scored from a secondhand shop years ago for $2, and then dyed. Out of the 99.7m (109yards) I just managed to eke out eight coasters.

Here are five: 

Cord Edged Coasters

This pattern uses US terms!
UK/AUS terms are in italics, eg: (triple crochet!

Yarn: I used DK weight yarn

Hook: I used a 4mm (G) hook


Start: Make a loop to crochet into, you could do a magic loop if you want to. Because I wanted to get the most out of my yarn, I made a slip stitch (leaving a very short tail), chained 4, then slip stitched into the first stitch to close it.

Round 1: chain 2, make twelve double crochets (triple crochet) into the ring, slip stitch into top of first double crochet (triple crochetto join.

Round 2: chain 2, make two double crochets (triple crochet) in the same stitch, and in each stitch thereafter. Slip stitch into the top of the first double crochet (triple crochet) to join. (24 stitches in total)

Round 3: chain 2, make one double crochet (triple crochet) in the same stitch, and two double crochets (triple crochet) in the next stitch. Repeat this pattern of one double crochet (triple crochetand then two double crochets (triple crochet) (1, 2) all the way around. Slip stitch into the top of the first double crochet (triple crochet) to join.  (36 stitches in total)

In the next round, instead of doing double crochet (triple crochet), we make single crochet (double crochet). 

Round 4: Chain 2, make one single crochet (double crochet) in the same stitch, a single crochet (double crochet) into the next stitch, and two single crochets (double crochet) in the stitch after that. Repeat this pattern (1, 1, 2) all the way around. Slip stitch into the top of the first single crochet  (double crochet) to join.  (48 stitches in total)

Now, the bit that feels really weird! We are going to do reverse single crochet (also called crab stitch) to make the edging. This just backwards crochet. I am left handed, so usually I crochet in a clockwise direction. For reverse single crochet, however, I crochet in an anti-clockwise direction. 

There are lots of video tutorials already on the web. I have embedded one at the end of this post.

Edging: chain 1, skip the closest stitch, and reverse single crochet all the way around for that lovely cord-like edging. Finish it off by cutting a tail of about 10cm (4inches), threading it only a needle, and making a couple of stitches that mimic the previous crab stitch. Weave in ends.

Now make yourself a drink and use the coaster!

This pattern is for personal use only. The pattern may not be distributed or sold. Items made from this pattern, however, are yours to do what you wish with, including selling.


http://www.mooglyblog.com/reverse-single-crochet-crab-stitch/

Monday, September 12, 2011

Crochet Slippers - Free Crochet Pattern!


A very long time ago, nearly two years ago to be exact, I made myself some slippers following this very excellent pattern.


Since then, however, I've tweaked and changed the pattern and made it my own. I've made well over half a dozen pairs of slippers using it, and I've finally gotten around to posting it on here so everyone can use it (also so I can link up my projects on Ravelry!).


Because I like to use 8 ply (DK weight) yarn, and it's what I have a lot of, this pattern is made with that in mind. The original pattern (see link at the top of the post) is written for 10 ply, if that's more your thing.

These slippers are quick and easy to make, I can make a pair in just a few hours!


Summer Slippers
(Ravelry Link) 
  • DK weight (8 ply) yarn in two colours (approximately 120m for main colour and 6m for edging colour)
  • 5mm crochet hook
    Tapestry needle for finishing and sewing in the ends
  • Two Buttons 
Notes:
  • Pattern uses US terminology. 
  • Stitches used: chain (ch), slip stitch (slst), single crochet (sc), double crochet (dc), stitch (st). 
  • Magic Ring (also called Magic Loop) -- magic loop video (here are some written instructions)  
  • dc4tog: yarn over the hook, insert hook into stitch, yarn over, pull up loop (3 loops on hook), yarn over, pull yarn through the first two loops on the hook (2 loops on hook). Leave these two loops on the hook, and repeat the process another three times - you will have a total of FIVE loops on your hook. Yarn over the hook, and draw it through ALL FIVE loops, so that you only have one loop on your hook. (If you need more help with this, go here: How to decrease double crochet)
  • sc2tog: insert hook into stitch, yarn over the hook, pull up loop (2 loops on hook), insert hook into next stitch, yarn over hook, pull up a loop (3 loops on hook), yarn over the hook and draw yarn through all three loops (one loop on hook)
  • sc3tog: as for sc2tog, but worked into three stitches instead of two, so you'll end up with a total of 4 loops on your hook before you put the yarn over the hook and draw it through all four loops.

INSTRUCTIONS

This first part is worked in rounds. Don't turn your work!
TOES:
Using your main colour, make a magic ring (see "Notes"), ch 2.
Round 1: 12 dc in magic ring, join with a slst. Pull the magic ring closed. (12dc)
Round 2: ch2, *dc in first st, 2dc in next st, repeat from* (2dc in every second stitch), join with a slst (18dc) 
Round 3: ch2, *dc in each first st and next st, 2dc in next st, repeat from* (2dc in every third stitch), join with a slst (24dc) 
Round 4: ch2, *dc in each first st and next two stitches, 2dc in next st, repeat from* (2dc in every fourth stitch), join with a slst (30dc)
Round 5: ch2, *dc in each first st and next three stitches, 2dc in next st, repeat from* (2dc in every fifth stitch), join with a slst (36dc)
Rounds 6 and 7: ch2, dc in first stitch and every other stitch, join with a slst (36dc) 

Now, you stop working in rounds and begin to work back and forth in rows. 

FOOT:
Row 1: ch 2, dc in first st and the next 23 st, turn (24dc)
Rows 2-13: ch2, dc in each st across, turn (24dc) (Adjust as necessary to fit your foot, my feet are size 7 and a half. For size 6 feet I do two less rows.)
Row 14: ch2, dc in each of next 10 st, dc4tog (see "Notes"), dc in next 10 st (21dc)


Okay, now this bit may be a little tricky, if you don't understand it at first, read it again, and if you still don't quite get it, don't be afraid to give it a go - crochet is easily undone! Essentially, we are making a seam to close up the back of the slipper. 

Chain 1, and make a sc in the first stitch and the next nine (9) stitches (total of 10 sc), and make a slst in the next stitch. Now, fold the right sides together and  slip stitching though the top of the dc and sc, repeat 9 more times (if you did a different number of dc rows, the sc may be at the front). The seam will be on the INSIDE of the slipper once you turn it right side out again.

We're up to the edging (part one)! And we're working in rounds again.

EDGING (Part One):
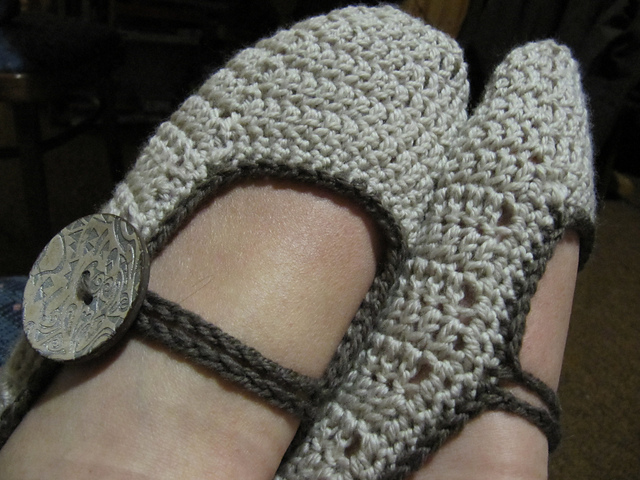
Round 1: ch1, 2sc in the side of each dc (see picture below), and in the top of each dc from the toes section, including the ones which were worked into when the foot section was started. (It should be about 70sc, but don't panic if it's not. So long as it's even it's fine.) At the end of the round, join with a slip stitch.

(This bit is confusing to explain too - hold tight! Basically, you make 4 seperate sc3tog at different (symmetrical) points around the round to tighten the slipper a little, keep that in mind and you should be fine.)  

Round 2: ch 1, sc in first stitch and next stitch, sc3tog (see "Notes"), then sc in each st until the second last sc before the one done in the dc what was worked into when the foot section was started on the previous round (did that make sense? See round 1 to clarify.) and make another sc3tog to tighten the corner. Work across the toes, making a sc in each st, finishing one stitch short again, and making another sc3tog. Work up the side of the slipper, making a sc in each st, stopping 5 sc short of the end of the row. Make another sc3tog, and then sc to end of round, joining with a slip stitch, cut the yarn and draw through the stitch.

The Edging (Part 2):
We're nearly there! Make sure you read ALL of the next step before starting. Also, for the second slipper, remember that the chain loop needs to be made on the FIRST side you sc down, not the second (as instructed below), otherwise one of your slippers will have the button on the wrong side!

Join the yarn you are using for the edging by inserting your hook in a stitch, drawing up a loop and making a chain. 
Single crochet in each stitch, making a sc2tog (see "Notes") in each of the front two corners. Approximately a third of the way up the second side (about 8 or 9 sc), make a chain loop by chaining 24, then make another sc in the SAME stitch. Sc to the end of the round, join with a slip stitch. (Remember, for the second slipper, make the chain loop while working down the first side.)

Finishing: 
Cut a tail of about 30cm, and draw it up through the last slst. Thread the tail onto the tapestry needle, insert under the very first slst (from Round 1), and back into the centre of the last slst. This makes an invisible join and is very neat. Weave the tail under the stitches of the same colour down the OPPOSITE side of the chain loop until it is even with the loop (hold the sides of the slippers together to determine this), and use the yarn to sew on the button.


Weave in all the end, put them on your feet and take a photo!


I hope you enjoy making some slippers for yourself - if anything is unclear, don't hesitate to contact me, either by email or through Ravelry. Likewise, if you see any mistakes or can think of a better way to explain something, send me a line!

Happy slipper making!


The copyright of this pattern remains with myself. It is provided free for personal use only. The pattern may not be reproduced for commercial purposes. If you want to sell products you have made from this pattern, you are free to do so (please refer to my FAQ page).

Creative Commons License
Summer Slippers by Katherine Crombie is licensed under a Creative Commons Attribution-ShareAlike 3.0 Unported License.

Tuesday, February 1, 2011

Urban Shells Beanie - Free Crochet Pattern!


You may remember that a year ago (nearly to the day!) I shared a pattern for a scarf

Well, finally, here is a beanie pattern to match! It was tested by some wonderful ladies, who I appreciate immensely.


The beanie comes in a range of sizes, looks good and is quick to make. And with the scarf... well... gorgeous ;-)


You can find the pattern for the Urban Shells Beanie here on Ravelry, or you can download a pdf from my "Crochet Patterns" page.

I hope you all love the pattern, because I know I do!

The copyright of this pattern remains with myself. It is provided free for personal use only. The pattern may not be reproduced for commercial purposes. If you want to sell products you have made from this pattern, you are free to do so (please refer to my FAQ page).

Creative Commons License
Urban Shells Beanie by Katherine Crombie is licensed under a Creative Commons Attribution-ShareAlike 3.0 Unported License.

Wednesday, October 27, 2010

Five Petal Pretty

While I was in the midst of my assignments I was playing with a crochet flower idea, and came up this this little five petal pretty. 


This flower uses a tiny amount of yarn, and takes about two minutes to make.


It's hard keeping all those loose ends hidden... I leave the ends so I can easily tie them to a hat (making them removable) or sew them to something if I so desire. 


I hope my instructions make sense! It's been awhile since I wrote them and assignment brain makes you think in abnormal ways!

Five Petal Pretty
Scraps of DK weight (8 ply) yarn
4.5mm crochet hook
Tapestry needle for finishing and sewing in the ends
Pattern uses US terminology.
Stitches used: chain (ch), slip stitch (slst), double crochet (dc).


Special Techniques: Magic Ring (also called Magic Loop)
--magic loop video (here are some written instructions)


INSTRUCTIONS
Make a magic ring, ch 2.
Round 1: 10 dc in magic ring, join with a slst. Pull the magic ring closed.
Round 2: *ch2, 4dc in the next st, ch 2, slst in next st, repeat from *
Finishing: 
Cut a tail of about 4 inches (10cm), and draw it up through the last slst. Thread the tail onto the tapestry needle, insert under the very first slst (from Round 1), and back into the centre of the last slst. This makes an invisible join and is very neat. Secure the tail by taking it under a few stitches, bringing it up near the other, starting tail.
I left the tails hanging and loose so I can use them to sew or tie these five petal pretties onto other projects, such as beanies or scarves.


Enjoy! And please, if you notice a mistake, let me know in the comments. 

The copyright of this pattern remains with myself. It is provided free for personal use only. The pattern may not be reproduced for commercial purposes. If you want to sell products you have made from this pattern, you are free to do so (please refer to my FAQ page).

Creative Commons License
Five Petal Pretty by Katherine Crombie is licensed under a Creative Commons Attribution-ShareAlike 3.0 Unported License.

Wednesday, April 21, 2010

Spring Blossoms - Free Crochet Pattern!


When you ramble through a garden in spring, you are sure to see flowers - lots and lots of them! So it makes sense to me (even though Tasmania is heading into winter) that blossoms should also be found on here, A Beautiful Ramble. 


I have had this little blossom in my head for a few days now, and last night the idea finally came into reality. Three realities, in fact. If one blossom is good, two must be better and so it follows that three must be best. (I also thought I should give my written instructions a little test run.) They only take a couple minutes each to make.

I hope, hope, HOPE this pattern makes sense! I wrote it after midnight last night. If you make it, please let me know! I would love to see. (Here is the Ravelry link).

Spring 
Blossoms
 
Scraps of DK weight (8 ply) yarn
4.5mm crochet hook
Tapestry needle for finishing and sewing in the ends

Pattern uses US terminology.
Stitches used: chain (ch), slip stitch (slst), single crochet (sc), double crochet (dc).
 
Special Techniques: Magic Ring (also called Magic Loop)
--magic loop video (here are some written instructions

INSTRUCTIONS

Make a magic ring, ch 1.
Round 1: 5 sc in magic ring, join with slst.
Round 2: (ch2, dc, ch2, slst) in same st as the slst from Round 1, *in the next st (slst, ch2, dc, ch2, slst), repeat from *.
Finishing: cut a tail of about 4 inches (10cm), and draw it up through the last slst. Thread the tail onto the tapestry needle, insert under the very first slst (from Round 1), and back into the centre of the last slst. This makes an invisible join and is very neat. Secure the tail by taking it under a few stitches, bringing it up near the other, starting tail.

I left the tails hanging and loose so I can use them to sew the blossoms onto other projects.

 
There you have it! I hope you like this little pattern! I certainly do.

The copyright of this pattern remains with myself. It is provided free for personal use only. The pattern may not be reproduced for commercial purposes. If you want to sell products you have made from this pattern, you are free to do so (please refer to my FAQ page).

Creative Commons License
Spring Blossoms by Katherine Crombie is licensed under a Creative Commons Attribution-ShareAlike 3.0 Unported License.


Wednesday, February 10, 2010

Amigurumi Pig - Free Crochet Pattern!


I had a dream... well, I had an imagine... of which I drew a sketch... then I waved my hook wand and look at what appeared!
This is Peninnah Pig. Her dress comes off, but don't worry she's a modest pig with her petticoat!
Oops, a Marilyn moment...
The dress does up with a button:
Ever since this little piggy appeared I have been writing, testing, changing and writing some more.
Finally, she is ready! (Here is the Ravelry link to the pattern.)

ETA: the pattern is now available as a pdf download on my "Beautiful Crochet" page - see the link below the blog header.

Penninah Pig 
You can use wool or acrylic for this pattern. Whichever you choose, use that type of yarn throughout.
DK weight cream/white yarn for petticoat: 5 grams (8 meters/8.7 yards)
DK weight pink yarn for body parts: 10 grams (20 meters/21.9 yards)
DK weight of any colour yarn you like for dress: 5 grams (10 meters/11 yards)
Small amounts of black and dark pink for embroidering facial details.
3.5mm crochet hook (next hook down from recommended hook size of 4mm)
Tapestry needle for sewing in the ends

Polyfill stuffing
Small button


Pattern uses US terminology.  
Stitches used: chain (ch), slip stitch (slst), single crochet (sc), single crochet decrease (sc-dec), double crochet (dc).


Special stitches:
--small picot: (slst, ch1, slst) in same st. 
--large picot: (sc, ch2, sc) in same st.
--mini puff: yarn over hook (yo), insert hook into indicated st, yo, draw yarn through st, yo, draw yarn through 2 loops on hook [half closed dc, 2 loops remain on hook]. Yo. insert hook in same st, yo, draw yarn through st, yo, draw yarn through 2 loops on hook, yo, draw yarn through last three loops left on hook. 

Special Techniques:
--magic loop video (here are some written instructions)

Notes: 'St' stands for Stitch, 'sk' means Skip, 'blo' means Back loop only. Make sure you read the additional notes where I have added them for the dress and body. **Except for the dress, all the pieces for the pig are worked in a spiral round (i.e. the rounds are NOT joined with a slst).


INSTRUCTIONS

 
Head:
Make magic ring, 
Row1: 6 sc in magic ring
Row2: 2sc in each st around (12sc)
Row3: *sc in next st, 2sc in next st, rep from* (18sc)
Row4: *sc in next 2st, 2sc in next st, rep from* (24sc)
Row5: *sc in next 3st, 2sc in next st, rep from* (30sc)
Row6: *sc in next 4st, 2sc in next st, rep from* (36sc)  
Rows7-12: sc in each st (36sc)

Row13: *sc in next 4st, sc-dec over next 2st, rep from* (30sc)
Row14: *sc in next 3st, sc-dec over next 2st, rep from* (24sc)
Row15: *sc in next 2st, sc-dec over next 2st, rep from* (18sc)
Row16: *sc in next st, sc-dec over next 2st, rep from* (12sc)
Row17: sc in each st around (12sc), slst in next st and fasten off yarn by cutting it and drawing it through the stitch. Leave 20 to 30cm for sewing to body.


Body:
Note: if you do not want a frill, omit rows 4 and 5 and do an extra round of 18sc.

Make magic ring, 
Row1: 6 sc in magic ring
Row2: 2sc in each st around (12sc)
Row3: *sc in next st, 2sc in next st, rep from* (18sc)
Row4: sc in blo of each st (18sc), ch1, turn whole thing upside down.
Row5: make a small picot (see Special Stitches) in the front loop (now the back loop as you are holding it upside down) of the st you just did a sc in, *sk 1 st, make small picot in next st, rep from *. At the end of the round, slst into the the first st that was worked into at the start of the round. Turn right side up.
Row6: sc in each st from row4 (18sc). (Before starting, count the st from row4 so you know which one is the first st. It might be difficult to get the hook into the first st. If it is too hard, just insert the hook through the backloop.)
Row7: Sc in each st (18sc)
Row8: *sc in next st, sc-dec over next 2st, rep from* (12sc)
Rows9-14: sc in each st around (12sc), slst in next st and fasten off yarn by cutting it and drawing it through the stitch. Leave 20 to 30cm for sewing to body.


Arms (make 2):
Make magic ring, 6 sc in magic ring, sc in each st, continue until arm measures 3cm (1 1/8") - around 8 rows total.

Legs (make 2):
Make magic ring, 6 sc in magic ring, sc in each st, continue until leg measures 5cm (2") - around 12 rows total. 


Ears (make 2):
Make magic ring, 
Row1: 6 sc in magic ring
Row2: sc in each st (6sc)
Row3: 2sc in each st (12sc)
Row4 and 5: sc in each st (12sc)
Fasten off yarn. Thread yarn onto tapestry needle. Squish ear together so it is flat and sew the bottom together.


Snout:
Make magic ring, 6 sc in magic ring, 2sc in each st around (12sc). Finish by cutting thread (leaving a tail long enough to sew it to the head) and pulling through st to finish off. Thread tail onto a tapestry needle, take thread under the first sc, and back into the centre of the last sc of the round to finish off the circle without a bump.


Dress: 
Note: leave 15 to 20cm before the starting chain for sewing on a button later. Once the dress is joined and you are working in rounds, always do the first dc of a row in the same st as the slst and ch1 that start the row.
Chain 17
Row1: dc in 6th ch from hook (loop thus created is a button hole), dc in each st to end (12 dc), ch2, turn.
Row2: dc in first st and the next st, ch2, sk 2 st, dc in next st, do a mini puff in each of the next 2 st, dc in next st, ch2, sk 2 st, dc in next 2 st, join to start of row with a slst (now dress will be joined in a circle. Try it on the pig. If you can't get it over the pigs bottom, try adding a ch before the slst. Sk over the ch in the next round so it does not change the st count. Alternatively, go up a hook size.) DO NOT TURN FROM NOW ON.
Row3: ch1, dc in same st, *2dc in next st, dc in next st, rep from *, 2dc in last st (18dc), join round with slst.
Row4: ch1, dc in each st (18dc), join round with slst.
Row5: Repeat row3 (27dc)
Row6: ch1, dc in first st, *2dc in next st, dc in next st, rep from * (40dc), join with sl st.
Row7: ch1, make a large picot (see Special Stitches) in next st, *sk 1 st, make large picot in next st, rep from *, cut thread (leaving a tail long enough to sew in), pull through st to finish off. Thread tail onto a tapestry needle, take thread under the ch1 from start of row, and back into the centre of the last sc of the round to finish off the dress invisibly.
Sew the button onto the dress, making sure it will fit through the button hole. Sew in ends.


Assembly:
1: Sew snout and ears to head. Embroider head with eyes, nostrils and mouth.
2: Sew legs to base of body. Sew arms to body, positioning them between the third and fourth row down from the top of the body.
3: Stuff body and head, sew together (remember that there is an even number of stitches around the head and body openings. I sew them together by matching the stitches).
4: Put the dress on and do up the button!
5: Gaze at the pig until she tells you her name. (Seriously, I try to name them, but they always end up picking their own! Weird, but true.)


Please, if you have any questions, let me know! 

The copyright of this pattern remains with myself. It is provided free for personal use only. The pattern may not be reproduced for commercial purposes. If you want to sell products you have made from this pattern, you are free to do so (please refer to my FAQ page).

Creative Commons License
Penninah Pig by Katherine Crombie is licensed under a Creative Commons Attribution-ShareAlike 3.0 Unported License.

Friday, February 5, 2010

Urban Shells Scarf - Free Crochet Pattern!


There is something immensely satisfying about having an idea, and then making it come into being. As I tell DH, I burst with pride inside every time I look at something I made that was TOTALLY my idea. It's such a rush!

The Urban Shells Scarf has been my latest rush... I love this scarf so much!


I named the scarf “Urban Shells” due to the combination of the shell stitches and the post stitches, which created ridges that remind me of power lines. The name of the scarf makes me think of Sandy Bay beach which is so very close to Hobart - a beach (complete with real shells!) in an urban area.


One of the wonderful things about this scarf is that the edging gets done as you go, so when you are done you actually are done! (And there are less ends to weave in - YAY!)


Here is the pattern - I hope you love it as much as I do! (For those of you on Ravelry, here is the link.)

ETA: the pattern is now available as a pdf download on my "Beautiful Crochet" page - see the link below the blog header.


Urban Shells Scarf
300m of DK weight yarn
4.5mm crochet hook
Tapestry needle for sewing in the ends

Measurements: 4.25inches (11cm) wide and 52.5inches (133cm) long

Stitches used (US terminology): chain (ch), slip stitch (slst), single crochet (sc), double crochet (dc), triple crochet (tr), back post double crochet (bpdc)* and front post double crochet (fpdc)*.

Here is a video tutorial for front post double crochet (fpdc) and back post double crochet (bpdc). (This one is good too.)

Special stitches: shell (sh): (2dc, ch1, 2dc) in same stitch or space.

Note: a bpdc gets worked when the wrong side (WS) of the scarf is facing you fpdc gets worked when the right side (RS) of the scarf is facing you. 'St' stands for Stitch,m 'sk' means Skip and 'chsp' means Chain Space (i.e. space created by chaining, such as in the center of the shell). I used 300 yards of a DK weight yarn, but the pattern will easily lend itself to other yarn weights.

INSTRUCTIONS:
Chain 26 (multiple of 5 plus 1 chain for turning)
Row 1: sc in second ch from hook. Sc in each ch across, turn (25sc)
Row 2: ch4, tr in same st, sk 3 st, (slst, ch4, tr in same st), rep across row, ending with a slst in the last st. Do not turn, instead rotate 180' (6 scallops)
Row 3: ch2, sh (shell) in first st, *sk 2 st, dc in next st, sk 2 st, sh in next st, rep from *. Turn
Row 4: ch2, sh in chsp of previous shell, *sk 2 st, bpdc around dc from previous row, sk 2 st, sh in next st, rep from *. Turn
Row 5: ch2, sh in chsp of previous shell, *sk 2 st, fpdc around bpdc from previous row, sk 2 st, sh in next st, rep from *. Turn
REPEAT ROWS 4 and 5 UNTIL SCARF IS DESIRED LENGTH (or the yarn has nearly run out!)
SCALLOP EDGING (so that both ends match!):
Row 1 (WS should be facing you): ch2, 2sc in chsp, *ch1, bpdc around fpdc from the previous row, ch 1, 3sc in chsp of sh from previous row, rep from * until second last sh, ch1, 2sc in sh, turn (25sc)
Row 2: ch1, sc in top of each st to the end of the row, turn (25sc)
Row 3: (ch4, tr) in same st, sk 3 st, (slst, ch4, tr in same st), rep across row, ending with a slst in the last st (6 scallops)
Fasten off yarn and weave in ends.

Stand back and admire, then wrap it around your neck and go look in a mirror!


Please, if you have any questions, let me know!

The copyright of this pattern remains with myself. It is provided free for personal use only. The pattern may not be reproduced for commercial purposes. If you want to sell products you have made from this pattern, you are free to do so (please refer to my FAQ page).

Creative Commons License
Urban Shells Scarf by Katherine Crombie is licensed under a Creative Commons Attribution-ShareAlike 3.0 Unported License.